This semester I have become much more courageous in terms of my use of materials. In class I have been exposed to many materials and techniques I have not used in the past. One memorable example of this is tyvek. I challenged myself at the beginning of the semester to really explore materials and to never use the same material in my weekly sketchbook entries. While not all of them are successful, I had fun and learned a lot.
This blog got me in the habit, first, of writing down the names of artists as they were mentioned. From there I was inspired to really research the artwork that has been influencing the contemporary art world. I have been spending tons of time creating an extensive collection of images if art that I find inspiring and that I think my students might also.
This class got me very excited about another visual resource I hadn't given one thought to previously: the overhead projector. I always associated this with math problems and English lessons and had no idea how powerful it could be in an art classroom. It completely transformed the room in so many ways, from text to cut-outs to packaging-tape-balls it created interest and set the topic for what we would be discussing. Even when it isn't projecting any color it lights up the room, I suppose literally.
One important thing I learned to remember is that I don't know everything and I shouldn't presume that I do. There are tons of things I can learn from the students and they can learn from each other. I saw this especially when we were using various computer programs to make our 'alphabet primers.' There are many ways to create something, and I think we all learned new ways to do something even that simple.
Another instruction technique I learned about is to flow with the class's interests and discoveries when creating lessons. Listening to the students can be scary though, because it means we have less time to plan and prepare as well as less control over the direction of the class. It allows the class to move somewhere meaningful and personal.
I am looking forward to continue the play I have been doing in my weekly sketchbook to my own studio work. I will be able to turn all of my experiments in materials I did into more developed pieces of artwork. I plan to search fabric stores and other places for different patterns that I will be able to spray paint over. For some reason I enjoy the entire process of painting so much more when it's over a pattern like that as opposed to a blank white surface.
I think students no matter what age just wanted to be affirmed through their artwork. This can be done by projecting images of everyone's finished work. It can also be done by showing the importance of displaying their work and allowing them to be a part of it. It can be done by something as simple as taking the time to discuss everyone's work, or treating the students like they are professionals. This can be done in printmaking by setting up stations and showing students how to clean and traditionally sign a print. We need to show the students they can be real artists, not just students pretending to be artists for 45 minutes at a time.
My new header image is two drawings I did when I was little, I think about 6. It just shows how far I have come and you really never know when art is going to just really click with a student and maybe change their life.

Monday, December 6, 2010
Week 13 Response
When I first walked in the room I couldn't figure out what was being projected onto the wall, so I walked over to the projector. It was those balls made by casting clear packaging tape cut in half. It was stunning and apparently and accident. It looked especially great as being large, simple shapes covering a large wall but with really intricate texture that kind of looked like fiberglass. It's a reminder to keep playing and experimenting and looking for new ways to do things.

Today we talked a lot about the use of stations in the classroom. They allow for movement around the classroom and surprise at the activity. It allows the students to feel independent and like a professional artist, for example when used during printmaking. Most importantly though, there is no teacher and no need to be taught. We can leave instructions for them, but cant guarantee that they will be read. The week we did printmaking we did something that may encourage the students to read a bit more. Before we even touched any materials we went to each station and just read the instructions. Doing this before anyone touches anything could help out a lot.
Stations allow for a lot of play, where the students can make their own connections. It can be a way to cover a large amount of material efficiently. It also makes the room more difficult to control. They might get too excited to read instructions and just get started working. We need to figure out a way to create balance between thinking and doing, and not just giving them busywork. There needs to be a definite reason to use the stations.
We displayed the work we created last week. We had to decide if we thought it would be best as a wall piece, a floor piece, or hung from somewhere. The next group would then display their work in a way that was a 'response' to the previous work. They would need to decide if it should be in the same or a different scale, if it is hung or set in a different way and why. We decided to put ours in a window, which looked really beautiful in the light.

Doing this would show the student the art doesn't just stop at the edges of the materials, but how and where its displayed can change the entire piece and even its meaning. It also affects the way you approach it, physically, but also emotionally and intelligently. Here is the way another group chose to display the spheres they made using tape casing.

Lastly, we should always remember there is no one right way to teach, just like there is no one way to be an artist. We should also keep this in mind while teaching, because each student will create art in their own way. We need to figure out how much room there should be, if a question is completely open ended, or restricted in some way.
Week 12 Response
We talked for a while about getting started on our final projects and what we might do. Im excited to begin. Im definitely going to continue working on a square canvas, its been really exciting and surprisingly different in terms of composition. It needs to include new thinking about our art. Im going to continue working with my cats as a my subject matter, and spray paint lace into the background. Through our discussion I decided to also include actual lace, which I think will work well with the embroidery I hope to also include.
We also discussed the freedom we have as artists and art teachers to change our minds and our plans at any time, which is exciting. This reminded me of when we talked a few weeks back about reading the class and using the students to develop and change the curriculum week to week.
A few materials and resources that were new to me were mentioned. One that I think is really exciting is the xerox transfer marker, for making transfers of photographs or text that have been xeroxed. We can find mirrored paper at Canal Plastics. I've been there and it's a really fun place. I will try to go soon and see what other kinds of things they have there. Useing the laser cutter was also mentioned, which has so many exciting possibilities. I just have no idea how I would go about doing that.
I heard an interesting concept in this class. Someone was wondering how to make a decision in their own work, such as which colors they should use. The answer was to consider the way you would teach color use to your students. We could teach how to use color to represent a mood or atmosphere, or for it to be monochromatic or use complementary colors, or a number of other things. We should ask ourselves "What is there to teach?"
A lot of times when I'm doing something difficult or complicated I will try to figure out how I would explain it to someone who had never done it before. We talked about something that reminded me of that. We might make something using paper or any other material into a 3D object, then figure out how we could move backwards into 2D and create a plan to make it again. This happened while we were discussion the carousel book. This is the best image I could find that was exactly what we talked about, including the base circle. This can fold right back up into a flat book shape.

We split up into three stations to create a simple form using the idea of balls and globes. They can be made from many materials such as aluminum foil, newspaper, anything rolled with glue, or paper mache. You could stretch fabric over a structure made by webbing or lashing materials like bamboo. Here are a few examples of balls in many different materials, including some that were purchased.

Station 1: We first made two hoops by bending and taping together bamboo, then lashed on strips of cardboard. This was so fun! It really made a difference when we curved the cardboard strips instead of just creasing them in some places. We got it to look fairly solid. Here it is in progress.

Station 2: This group did tape casting from existing balls such as basketballs and baseballs. They are made by laying layers of tape on the ball or object sticky side up to begin with then layers with the sticky side down. Enough layers of this will make a casing that can be cut off.
Station 3: This group made a stop motion film using a ball of clay that was to split up then come back again.
A bunch of artists were mentioned during our discussions, so here are a few that I particularly liked...
This is Kehinde Wiley. I couldn't find titles to these pieces, but I do know that his work is inspired by traditional artwork that he replaces the subjects with young black men. The way the pattern moves behind and in front of the man is beautiful, and is something I want to explore with my final project.


This is Tim Knolls, who lets the trees do the drawing. Beautiful.

Lastly, here is Trenton Doyle Hancock. His style is so exciting and I love his use of color and text.

Thursday, November 25, 2010
Week 11 Response
First of all, I LOVE the Paul Klee printing technique. I have never seen anything like it. I love how it kind of takes away absolute power from the artist and results in something so beautiful and unique. The final product is exciting and is a surprise. The effect and texture it creates is gorgeous as well. I think students of all ages would love to try this technique. My only concern is the process of setting up and cleaning up the oil based ink it requires. I'm glad we're adding things like color to these prints. They are too cool and have too much potential to just stop at this first step. It's good we made the distinction between a painting and a print and were told to only use simple washes. I think this complemented the printing technique without distracting from it. I think it might be interesting to add small details at the end of the process in black pen or a fine black marker. This would allow the students to bring a bit of control into a process that by nature does not allow for control. Here is mine, then a table with a few others'.


I was not sold on the corrugated cardboard prints. Even the very best ones I found to be mediocre, and most were a disappointment. The ribbed texture was interesting but was not a bold enough statement, even when we varied the paper, color, and amount of ink used. The texture could instead be incorporated into a different technique to use it to its full potential. It could be used in the collograph prints, which I have always been a fan of. They're so simple and have such great results. I was actually surprised at how successful they were in the project because of how small the variation of thinnesses we used were. Here is mine. This is actually my second one. I liked it better with the one image overlapping, but I don't think it followed directions.

I did like the stickers made from our corrugated cardboard plates better than the actual print. This could be a really fun thing to make, especially with younger kids. One change I would definitly make is having the student make stickers then make prints. I was sitting around for a very long time waiting for my ink to dry before I could continue. The class began to slow way down while most people had finished but we were still supposed to be working.
We did several small activities that I think could help a student feel more responsible and more like a real artist or printmaker. The first one was when we first began the class we discussed who needed to do what task to continue from last week. When we figured that out each group of us went and set up our own stations. Also at the very end of our printmaking we were to sign, date, title, and number our prints as well as clean them up and tear the edges. This makes a student feel like they are creating actual art. I also learned at A/P means artists proof.
Monday, November 22, 2010
Week 10 Response
We were very active during this class, making several different prints. Because of this I did not take the notes I usually take, so this might be brief.
The way we began was interesting because we had no idea what was going on. I was confused but it also took the pressure of of beginning a project. We were talked through the activity in small, clear instructions. "Cut the biggest shape that can fit into this square. Cut a big shape out of the first shape. Cut a small piece out of one side. Cut four of the most interesting legs you have ever seen. Cut six of the scariest teeth you've ever seen. Cut four of the same small shape, about the size of your thumb nail." I might have missed some steps or numbers, but this was the idea. We made many unusual shapes without having to imagine them for a specific body part, letting us be more creative in the actual pieces. We were only then told how to use these shapes and to glue them down. We repeatedly were told to lift our 'monster' to make sure everything was glued down and nothing was glued to the paper. This would be a great trick especially for little kids.
Our second plate was the most simple, the main portion being a silhouette of an animal. We were shown many example silhouettes and were told to do an actual animal. I might have not required this, but asked to keep in mind certain animal traits. When we finished cutting we were asking to make yet another cut which showed a little more detail.
For our last print we drew the scariest face we could think of and were told to keep it loose and not to add too much detail. I drew a wolf monster. This class was super relaxing and a preparation for week 11.
Monday, October 25, 2010
Week 8 Response
One thing we mentioned in class that was very exciting is Blurb. It allows you to create customized books and pamphlets. They look great and professional and I think students would absolutely love it. It would be so affirming to have your art work in a book like that. Its not that expensive, too, between about $3- $36. It would also be a really good way to raise some money for the class, by having students or their families order one. They are also easy to make, just by choosing the lay out and styles. The students themselves could actually make the books themselves which would feel very rewarding.
We watched everyone's final videos in class. I feel like watching the videos two times, including last week, felt very tedious. If it was hard for me to pay attention it would be even harder for the students. I think only watching them once would be better. Maybe instead of watching the first run through of all the videos we could watch one or two just to get some ideas of how to improve them. Another way to change this might be to split into groups so each student only watches a couple, but I don't knoq how this might work. Also I made the suggestion of having each group pick a theme. Watching the videos then might be better because we wouldnt be watching the exact same letters over and over.
I love love loved the book Eco Books: Inventive Projects From the Recycling Bin by Terry Taylor. It's about making books out of unconventional and found materials. Some examples used were cereal boxes, floppy disks, baggage tags, wood blocks, CD cases, credit cards, maps, cassettes, egg cartons, orange juice containers, and mouse pads. For my book making class I made a book out of found pieces of metal that I epoxied together and wrote on with puffy paint. I will post pictures of that soon. Another book was Magic Books and Paper Toys by Esther K. Smith. It looked pretty interesting, but I need to spend more time with it than just flipping through.
Here is a picture of the kind of book that we're making our graphic novels. It's pretty cool, but I forgot to get the name of it and the author, so I'll do that next class.

We also discussed ways of making 3D paper of binders to work work in. We can do this by rolling up news paper and taping it down then paper macheing it down. The example had some sort of lacquer on it that had an interesting look.
Sunday, October 24, 2010
Week 7 Response
We went through each person's alphabet slide show and discussed what needs to be improved or added to make it better before turning in the final product. This included adding a title pade, credits, music, cropping and color correcting. I realized there were a bunch of things I could fix. I needed to make each letter clearer by showing the entire letter.
We also recieved the rubric for the project. At first I thought we were going to make the rubric together and thats what we were actually going to be working on, as opposed to the videos. I liked this idea though, of including the students in the process of deciding what will be graded. This would be an interesting way to increase the students' investment in the project. Whether or not they help in the creation, I think it's good for them to be given the rubric early so they can see what's important in the project.
I was confused several times during this shirt period of time. During the discussion about the alphabet slideshows I though we were going to move around the room in a circle, with one person showing their project, another leading the discussion, and another keeping time. I loved this way of changing who led the crit was a great way of keeping everyone involved and engaged in the discussion. It also gives each person a certain level of responsibility.
Aileen told us how important it is to not take the stance of knowing everything as a teacher. We would very quickly be proved wrong. We should ask what they know and different ways of doing things that they know of. Even in our class there were tons of ways of making our slide show videos. Some of the programs different people used were imovie, iphoto, powerpoint, flicker, slideshare, audiohyjack, preview, rapidshare, and dropbox.
I hadn't heard of dropbox before this class and it is amazingly useful. I have already used it for a bunch of different purposes. Dropbox can have so many uses in the classroom. It can include seeing other students' work, turning in projects, showing examples, references, and anything that the students might need or want to view outside the class room.
Someone brought up the artist Martin Creed. I found a bunch of interesting work by him, but three that are consistent with his moving in steps. I love how this just kind of makes sense. Arranging objects this way is such a natural thing to do, and is done by very young children for play. It makes for interesting art.
This first piece is Work No. 916 "Boxes" (2008)

This is Work No. 928 "Tables" (2008)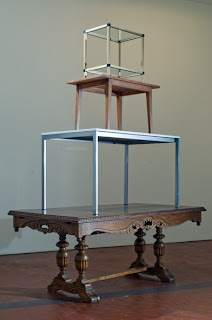
And this is Work No. 990 "A curtain opening and closing" (2009)
We also recieved the rubric for the project. At first I thought we were going to make the rubric together and thats what we were actually going to be working on, as opposed to the videos. I liked this idea though, of including the students in the process of deciding what will be graded. This would be an interesting way to increase the students' investment in the project. Whether or not they help in the creation, I think it's good for them to be given the rubric early so they can see what's important in the project.
I was confused several times during this shirt period of time. During the discussion about the alphabet slideshows I though we were going to move around the room in a circle, with one person showing their project, another leading the discussion, and another keeping time. I loved this way of changing who led the crit was a great way of keeping everyone involved and engaged in the discussion. It also gives each person a certain level of responsibility.
Aileen told us how important it is to not take the stance of knowing everything as a teacher. We would very quickly be proved wrong. We should ask what they know and different ways of doing things that they know of. Even in our class there were tons of ways of making our slide show videos. Some of the programs different people used were imovie, iphoto, powerpoint, flicker, slideshare, audiohyjack, preview, rapidshare, and dropbox.
I hadn't heard of dropbox before this class and it is amazingly useful. I have already used it for a bunch of different purposes. Dropbox can have so many uses in the classroom. It can include seeing other students' work, turning in projects, showing examples, references, and anything that the students might need or want to view outside the class room.
Someone brought up the artist Martin Creed. I found a bunch of interesting work by him, but three that are consistent with his moving in steps. I love how this just kind of makes sense. Arranging objects this way is such a natural thing to do, and is done by very young children for play. It makes for interesting art.
This first piece is Work No. 916 "Boxes" (2008)
This is Work No. 928 "Tables" (2008)
And this is Work No. 990 "A curtain opening and closing" (2009)
Subscribe to:
Posts (Atom)